| Our new house got windows and solar panels installed |
Isolating the walls of the ground floor, |
We finished a task from our house todo list!
This week we finished a task from the todo list we got from our builder. It was task number two, isolating the outer space between the floors. But let us start at the beginning of the week.
Monday 13 July
Today we had regular work from the home day without a lunch walk. That is fine as well because I did my walking this past weekend while moving planks.
We went to the new house to give the plants water and prepare for the third stack of red planks to be placed in the container. Then we got two piles in the sea container and one outside.
Today I decided to make portrait photos of many of the plants we have. The last time I did that was on 20 April.
|
Here is a Sorbus tree. In Dutch “Leisterbes” and Swedish “Rönn.” The only I got so far. She is growing nicely. |
|
|
European Ash. It is called “Es” in Dutch, and in Swedish, it is “Ask.” The sides of the leaves have a little sawtooth pattern. |
|
|
Maple. In Dutch “Esdorn” and Swedish “Lönn.” They got frostbite but recovered and are doing nicely. |
|
|
Elderberry. Dutch “Vlierbessen”, Swedish “Fläder”. |
|
|
Here is a Populus alba or White poplar. The leaves are shaped a little like maple leaves, but they got a glossy green upper and soft white underside through summer. |
|
|
Populus Tremula. It is also called aspen, common aspen, and European aspen. |
|
|
European Elm. In Dutch “Iep,” and in Swedish, they are called Alm. The leaves remind of Beech, but Beech got no small teeth on the edge of the leaves that the Elm got. My Beech trees did not make it. |
|
|
Field maple. In Dutch “Spaanse aak”. |
|
|
I think this is an Elm as well due to its edged sawtooth leaves. This tree needs a bigger pot. |
|
|
Common holly, Ilex Aquifolium. In Dutch, “Hulst.” |
|
|
Alkmene apples. |
|
|
Pumpkin. |
|
|
Tomato plants. Regular size to the left, small to the right. |
|
|
Here is the blooming onion. It is the size of a tennis ball. |
Tuesday 14 July
In the morning, we got contact with the water drilling company. Establish communication via e-mail is nearly impossible with this company, so we phone them, and that works, when they answer the phone. They will come and drill for water on 3 August. Good news! That talk about it takes five weeks before they can drill was just nonsense after all.
I had a look at the new house during lunch, and there I met the window specialist, Koen. He was just finished with his work. He told me there are two windows with defects that will be replaced, and there is one window where the lists were defective. They will come back and fix these issues when they received the replacements.
Thursday 16 July
 Today we started on our house building holiday! We had to be on time at the building site because the company putting up the roof tiles was supposed to start working today. They arrived ten minutes before us. They had a smaller scaffold that would be insufficient for this house. They also had remarks about the order of how things were supposed to be done. To get this sorted, they had to talk to our building company but could not answer the phone right away. In the waiting for establishing contact, they made a cup of coffee. We had the water with us and cookies, and they had coffee and a coffee machine. Our building company had lent out their generator since our generator was too weak. That was an excellent start of the day.
We don’t have any urgency on our side that the roof tiles need to be on the roof today. The roof is watertight, and it can still endure a little weathering before the tiles are put in place.
After a while, the roof tile company called off the activities for today; without that, they had done anything. Our building company and the roof tile company had agreed on doing this work today, and it was a little surprising that it did not happen, but no harm is done. The owner of our building company was a bit annoyed, though.
 I got it figured out how things should be mounted at the end of the roof and what the items are and how they should be positioned according to each other. On this drawing here, the roof tile is not included in the picture. It will be placed on top of the roof tile beams.
- On the roof, there are vertical roof tile beams.
- On top of these are there horizontal roof tile beams.
- Outside and under the part of the roof sticking out the fascia boards should be mounted. The outside board should overlap the inner board so that when the wind brings rain to the board, it will drip off at the board.
- The fascia boards should be mounted on top of beams with ventilation ridges. The ridges should be faced towards the house.
The roof gutter brackets should be mounted on top of the two lowest horizontal roof tile beams.
 On the short sides of the house, the same principle with the fascia boards should be applied.
- Here are the vertical roof tile beams on the roof.
- The horizontal beams are on top of that. It is the same situation as in the previous drawing, but here we are looking from the side of the building.
- The fascia boards should be mounted so that the outer board is overlapping the inner board.
- The same beams should be used here. They have ventilation grooves that should be mounted towards the house.
The side of the outermost tile has an overhang that will be outside the fascia board.
 When the roof tile company had left, we started on the main task of the day. To move the remaining package of red planks to the container. We decided to move the planks to a place in front of the first stack, but we made this stack 4 planks wide so that we had more space left to walk in the container.
To do this, we had to cut beams to length, and we wanted to use our own generator for this. It got an issue. It was puffing and shaking and producing very little electricity. At some point, one builder working at our neighbor’s house shouted to us to turn off the choke. The problem was, it was turned off. There has happened something to the machine, and now it is not running smoothly anymore. After some tinkering, it ran well enough, so that we could cut the beams, and then we put it away. I will have a look at it another time.
With this, we got two packages inside the container. Totally dry and out of the sun. There is one package outside under a tarp, and the question is if this stack will get problems with moisture. I think we will need to keep an eye on that.

 When we finished moving the planks, we started on the first point of our todo list we got from the builder. To tape joints with green tape. For this, we had to work a little higher up, and we had not brought with us any smaller ladder. So we had to go to our old home and get it. On the way, we decided to pick up a new ladder with four sections that you can also configure into a platform. It worked like a charm with the platform, and it is such a useful tool with this kind of work. We taped the joints on the ground floor. Then it was time for watering plants.
 Today we noticed that two of the pumpkin plants had been eaten by snails. That is sad. Now there are only two plants left.
There were birds around the house in the evening. I took photos of this while my wife was hunting thistles.
|
On the other side of the main road, there is a little lake that birds like to stay. |
|
|
|
|
|
|
|
|
The field next to our house, still empty from other homes and families, was frequented by birds of various sorts. In the distance, I noticed a stork pair. |
Today there were 12 millimeters of water in the rain gauge.
Friday 17 July 2020
This was the second day of our holidays. We had a slow start today.
First, we went shopping for screws for the beams in the city. Actually, these screws are part of point three of our todo list, but it was feeling okay to have them in stock already now. We searched for screws 4 by 70 millimeters with a drill tip. We went to two different hardware stores, and this product was nowhere to be found. Online it was effortless to find them and order them and pay for them in such a way they would be delivered the same afternoon. This is the second time that we had a shopping disappointment like this. If more people are feeling the same, people will stop buying things in regular shops and order items online. Is this a trend, then city centers will become empty in the future.
Overall the things we did today were not so picturesque. We continued on taping the green tape on the first floor. Up here, the ceiling a little higher, but we could work on our regular aluminum ladder.
We mounted a pulley that we bought today. With this, we can pull up things to the first floor like, for example, the brown floorboards. Tomorrow we will finish the green tape.
It was warm weather, and it is nice to have the doors open. The problem with that is that when they open up, they could smash into the isolation and the blue foil. To prevent this, I mounted a wood beam, and on that beam, I placed a ring of the orange towing band that I could slide over the handle to keep the doors in the open position. Much better.
A friend came and visited us. We could show the house and how far we had come to finish the building, not far at all.
Saturday 18 July 2020
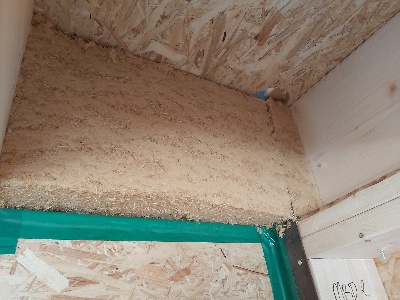
Today we split the work such as my wife applied the green tape, and my daughter and I started on point 2 of the todo list: “On the ground floor between the floors towards the outer wall, isolate the gaps between the stories with isolation number 180.” We brought in the isolation material, and we found that there was one pallet with eight packages of this type. The number 180 indicates the thickness in millimeters. I was not sure about this when I wrote the todo list. That means the isolation is 18 cm or 7 inches thick.

 We started in the hobby room, on the ground floor and worked our way to the other side. It was more challenging in the living room because there the openings were smaller.
My daughter helped by measuring pieces of isolation and then saw these. I mounted the chunks. This isolation material was made out of wood fibers. It did not itch or hurt when the dust from the isolation spread in the air.
 On the first floor, my wife worked on the tape. Every time we walked past a specific corner, it smelled funny. I said, “there cannot be anything. There have been no animals here,” but that was not true. My wife could show places where birds had left spillings on the floor. From the moment that the house had been assembled and windows were mounted, birds could stay in the house. Between 23 June and 10 July, they had 17 days to stay in the house. I had not noticed the spilling on the floor before, but that was indeed the case. But if that was so, they could also try to save a little treat for later as well. We found out that they had been staying at beams high up in the house. I started to explore locations high up in that you could use as a hiding place. Above the door to our future study, I found it. It was a dead mouse. I took the corpse and brought it to a more suitable location outside. Quickly the funny smell vanished.


|
Here is a heron. It is hunting for mice |
|
|
It got a mouse. The mouse was making helpless sounds, but the heron was determined to eat this snack. |
|
|
With a little juggling movement with the head, the mouse was placed inside the beak. |
|
|
Swallow and done. Yummy. |
We ended the day by watering the plants. This was a beautiful day. We booked significant progress on the house, and it was feeling good.
Sunday 19 July
 Today we got no help from our daughter. She went back to her own place. I finished point 2 of our todo list at midday, and at the same time, my wife had used all the green and black tape that we had received from the builder company. This means she could not continue on point 1. At this point, we decided to have a lunch break. It was feeling like the perfect moment to take a break.
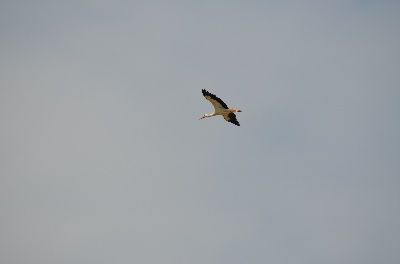
During our break, the stork offered us a private bird aviation show.
|
Stork number one showed us its beauty. |
|
|
The stork bird can have 1. 65 meters between the tips of the wings, that around 65 inches. |
|
|
The stork has red legs. |
|
|
|
|
|
A couple of thousand common starlings (Sturnus vulgaris) provided a variation on the theme “extreme formation flight.” Humans do a triangle in a straight line, but these do an elaborate formation flight by the thousands with bows and loops. |
|
|
Followed by another round of stork number two. |
Around here, when I was just about to walk around the fence to take better photos of the common starlings, we got human visitors. It was my brother in law and wife that arrived at our house.
Have I told you before that my brother in law is an excellent handyman? We showed them what we were about to do at point three of the todo list. My brother in law was not impressed with the screws we had bought. I know there are more handy screws, but I had not reflected over the choice when we purchased them, but sure he was absolutely right in that Pozidriv screw-heads are less convenient than Torx screw-heads. He even considered hex heads even better. I really do know, but it did not occur to me while we bought the four boxes with screws. Oh well, we will finish these boxes, and next time I will keep an eye out for that, we will order screws with more convenient screw-heads. Lesson learned, Jan, I promise!
We had a look at the power generator. There was a screw setting the mix of air versus petrol on the carburetor that we had to adjust. When that was done, the generator ran like a charm. That was necessary because we then went ahead, preparing for putting beams on the wall, and we used a lot of machines for that: A tabletop saw and a circle hand saw and an angle grinder. The pile of brown floorboards became the working table. I placed the power generator around the corner and connected it to an extension cord. We started mounting the beams in the living room on the west wall.
That was convenient because the doors to the garden were open, and the generator could stand outside around the corner. Right now, we let the generator run for a while, and then we turn it off. That will become inconvenient after some time. Especially when working on the second floor. The machine will always stand outside. The longer away we are from the generator, the longer we will let it run. I think we will talk about making batches of work and let the generator run while we prepare a bunch. All this is something that will get its form in the coming days.
 How to beam the sides were not precisely apparent. At first, we thought we would get away with putting one beam inside the corner (see picture 1). Then obviously, the gypsum plates will come on top of that, and later, when we do the other wall, there will need to be a beam on that wall as well so that the gypsum can be mounted on something. The only issue with this is that we will not work like that. We will beam the walls, put isolation in-between, and then the electrician will put pipes there as well, and not until the tubes are mounted, the gypsum will be placed on top of the beams. The method in picture 1 will not work.
 For this reason, we need a way of putting up the beams so that we can also put electricity pipes between the rafters. The corner will be left empty. Well, there will be a strip of isolation. I do think we will leave this space open until we had the electricity pipes installed. Perhaps there are bows that we will put there, so we will remove one of the beams and drill holes, mount the pipe bows and then put the rafter back and a strip of isolation.

We learned a lot today. Tomorrow morning we will see if we can get more of the green and black tape. We will also ask what the triangular shape beams will be used for. We will tell the building company that we do not need the fence anymore. Also, we will complain a little about the lock on the front door. You cannot open the door with the key. But that is for tomorrow and next week.
 One more thing, we got a gift from my brother in law. He came with two big doorstep grids. This will be wonderful for our house to keep the dirt out, and there is a lot of sticky clay here in this area, so this is a perfect present. We can have one outside the hobby room door and one outside the front door. I will build something to put these on, but that is for a later project.







 Started plastering the wallsBarn’s ceiling paintedPlastered the ceiling of the barnPlastering the ceiling of the barnInstalled the Murphy bedMore gypsum boards in the barnThe lamps in the hallway were installedInstalled more lamp fixturesLight installationsSea container picked upSea container soldFinished cleaning the sea containerNice sunrise picturesGreat progress in the barnSeacontainer on sale
 I moved from Sweden to The Netherlands in 1995.
Here on this site, you find my creations because that is what I do. I create.


